Ads 468x60px

Pages

Thursday, April 28, 2011

Artsy Addicts Technique Blog Hop


Welcome to the Artsy Addicts Technique Blog Hop. You should have come here from Teri Dorowsky's blog. Come check out the Creativity Bugs blog to see a nifty flower technique, enjoy collecting a few recipes, and then click here to go to Marion Smith's blog for the next technique.

I love flowers!! There is nothing I like better than to create a scrapbook page, card, or tag and embellish it with my favorite Prima flowers. They are big, luscious, glittery, fancy smancy, and stand out on a page.


My problem is that my love of Prima flowers and my pocketbook do not agree. So, I searched all over the web looking at websites, blogs, and YouTube videos trying to find a way to make these flowers without putting me in the poor house.

After countless hours, I found a few great sites, combined their ideas, and came up with the Creativity Bug version of the perfect paper flower.

Supplies:

large flower punch (Retro Flower by Paper Shapers)
double sided pattern paper
light weight card stock paper
coordinating brad
paper piercer
spritz bottle filled with water (optional)
Distressed ink (optional)
Stickles (optional)

Step 1:  Punch out 8 of the same sized punches from pattern paper or cardstock


Step 2:  Distress the edges of the punched out paper pieces with coordinating ink (optional)

Step 3:  Scrunch up punched out paper pieces tightly. If you are using thicker cardstock paper, spritz lightly with water before scrunching up.


Step 4:  Carefully open up scrunched up paper pieces and stack.

Step 5:  Pierce a hole in the center of the paper pieced stack with a paper piercer.


Step 6:  Insert brad and tighten.


Step 7: Re-scrunch the paper pieces starting tightly with the top piece and more loosely with each layer following.


Step 8:  Fluff the paper pieces until it resembles a flower.

Step 9:  Add Stickles to flower tips to add an extra touch of bling!


For variation, punch out 4 flowers in one color and 4 flowers in another to create a variegated rose.


Or try using a different flower punches to create a different style of flower. The first flower shown uses the Paper Shaper punch called Daisy. The second flower shown using the Stampin Up punch called Flower.


Here is a look at all three different flowers.


If you like what you see, please leave a comment or become a follower of our blog.
Creativity Bugs ~ Sandy and Sue

Make Your Own Glimmer Mists


Glimmer Mists are all the rage, but can get pretty expensive to have every color in your collection. To save money, I found 3 different recipes to make your own glimmer mists for all your paper crafting projects.

Color Mist 1

Ingredients:

Liquid non aerosol hairspray
Small spray bottle
Pearl Ex powder 


 Directions:
  1. Fill small spray bottle ½ full of liquid hairspray
  2. Add ¼ teaspoon PearlEx powder & shake well
  3. Add additional PearlEx powder as needed to deepen color

Color Mist 2

Ingredients:

White Glue
Popsicle Stick
Water
Empty Spray bottles
Metallic / Pearlescent Acrylic Paints


Directions:

1.       Fill your spray bottle about 3/4 of water
2.       Dip popsicle stick in white glue and mix with water in bottle. The glue will act as a binder.
3.       Add one to two drops of paint to water and glue mixture. Shake well.
4.       Spray onto white piece of cardstock to test out color.
5.       Add more drops of paint as needed.


Color Mist 3

Ingredients:

Spray bottle
Liquid decoupage lacquer or PVA glue
Water
Pearl Ex powder


Directions:

1.       In a spray bottle, mix equal parts decoupage lacquer and water, about 20 ml of each will go a long way.
2.       Add ¼ teaspoon of PearlEx powder, put on the lid and shake well.
3.       Spray on white piece of cardstock to test out color.
4.       Add more PearlEx powder as needed to intensify color


Try out some of these glimmer mist recipes and let us know what you think!
Creativity Bug ~ Sue

I Won! Imaginisce d-stress Tool

I'm so excited and I just can't hide it!! 

I don't usually make comments on blogs with the belief that I am going to win anything. Mostly I post to leave recommendations, compliments,  and to spread the love with my fellow bloggers. However, last week on the Imaginisce blog you had an opportunity to watch a demonstration on the new d-stress tool, leave a comment, and have the chance of winning it. And I actually won!


The d-stress tool is a hassle-free way to distress your edges from Imaginisce! The distressed look is in! Now it's easy to get that archival touch for photos, cards, and other paper crafts - right down to the finest detail. This rotary tool comes with three different crafting tips. As well as being cordless, running on 2 AA batteries (sold separately), you can take this ergonomic tool with you and work anywhere.

I can’t wait to receive my package in the mail and post pictures of my completed projects.

Creativity Bug ~ Sue

Recipe Friday: Side Dishes

Looking for the perfect side dishes for your grilled steak, fish, or poultry meals? Look no further and enjoy yummy roasted potatoes and fresh asparagus with prosciutto.

Roasted Potatoes and Lemon with Dill


Ingredients:

2 pounds new potatoes, halved
1 lemon, thinly sliced
2 tablespoons olive oil
kosher salt and black pepper
2 tablespoons coarsely chopped fresh dill

Directions:

  1. Heat oven to 450° F. On a rimmed baking sheet, toss the potatoes and lemon with the oil, ¾ teaspoon salt, and ¼ teaspoon pepper.
  2. Roast, tossing once, until tender, 25 to 35 minutes. Toss with the dill before serving.


Asparagus with Prociutto Chips


Ingredients:

3 ounces thinly sliced prosciutto
2 small bunches (about 1 3/4 pounds) asparagus, trimmed
1 tablespoon extra-virgin olive oil
1/4 teaspoon kosher salt
1/4 teaspoon black pepper

Directions:

  1. Heat oven to 350° F. Place the prosciutto in a single layer on a baking sheet. Bake until crisped, 8 to 10 minutes. Transfer to a plate and let cool. 
  2. Meanwhile, bring a large saucepan of water to a boil. Add the asparagus and cook until tender, 3 to 5 minutes, depending on thickness. Drain and transfer to a bowl of ice water. Drain again and pat dry.
  3. Cut the asparagus into 2-inch pieces. Transfer to a bowl. Add the oil, salt, and pepper and toss. Break the prosciutto into pieces and sprinkle over the asparagus

Happy Friday!
Creativity Bug ~ Sue

Wednesday, April 27, 2011

BESTeam Weekly Feature - ElizabethMD Designs

Come check out this week's BESTeam featured site ElizabethMD Designs Etsy shop!

ElizabethMD Designs owner Elizabeth is obsessed with creating unique jewelry. Growing up she would buy clothes and jewelry, only to get irritated when someone else was wearing the same thing. She “couldn’t wear that piece anymore” after that. Finding that it was “too expensive” to have new jewelry and clothing every day, she started to take apart jewelry to make her own originals.  That was 15 years ago and now the passion has grown into creating unique jewelry for others to wear.


A yummy Macintosh apple wrap-a-round bangle. Adjusts to fit most wrists and gives you fun whimsy that can practically go with any outfit. The Coral nuggets are stranded on 7lb test memory wire, giving it durability along with flexibility in use.


Multi Chain Tassel Bracelet With Fuschia Coral Accent


This Multi-chain bracelet wraps around your wrist with a little fuchsia pearl nugget attached to the tassel that is sure to catch people’s eyes.

Red Flower Ring with Diamond Center and Silver Trim


This listing is for a silver lined lipstick red 2.2CM resin flower cabochon resting securely on a silver *NICKEL FREE* adjustable ring. These rings fit from sizes 5-9ish easily.

Copper Flower Filigree Necklace


A bouquet of flowers trickle down from this necklace. The bouquet is made up of copper filigree flowers. The bold statement made by this necklace is only accented by the double layering of copper chains.

These are only a few of the wonderful pieces of jewelry available. Please check out the rest of this beautiful collection at ElizabethMD Designs and also take the time to view the ElizabethMD Jewlery blog.

Happy Shopping!
Creativity Bug ~ Sue

Monday, April 25, 2011

Featured Freebies for the Week of April 25th

Happy Monday Everyone! I hope that everyone is not too stuffed from all the Easter goodies eaten yesterday.

Here are the latest digital stamp and clip art image freebies found on blogs, websites, and sent to us by friends.

Heather Sitarzewski has an adorable bunny digital stamp

Beccy's Place has gone sunflower with a bunch of Sunflower and Gerbera images including leaves

Bross Art Addiction posted a ton of new circle sentiments for different occasions

Netty's Cards also posted a bunch of new circle sentiment digital stamps

Louby Loo's Digital Delightss is giving away a free digital stamp of Time for Tea Booboo

Fimolas Arts has a few new digital stamps including this adorable birdhouse

Happy Crafting!
Creativity Bug ~ Sue

Sunday, April 24, 2011

Happy Easter


The Easter feeling does not end.
It signals a new beginning,
Of nature, spring and brand new life,
And friendship, peace, and giving.
The spirit of Easter is all about,
Hope, love, and joyful living!


Wishing you and yours a very Happy Easter!
Creativity Bugs ~ Sandy & Sue

Friday, April 22, 2011

Recipe Friday: Chicken, Broccoli, and Cashew Stir-fry

When I was 12, I went to a slumber party at my friend Tina's house. As part of a dare (we were playing truth or dare), I was dared to eat broccoli. Having never eaten it before, I thought it was the worse form of torture that anyone could have placed on me, but surprisingly it was love at first bite.

Today's featured recipe is for a stir-fry using my favorites; chicken, broccoli, and cashew nuts.


Chicken, Broccoli, and Cashew Stir-fry

Ingredients:

3 cup broccoli florets with short stems (about 1/2 lb crowns)
2 large carrots, cut into thin diagonal slices (2 c)
5 oz soba noodles
1 Tbsp olive oil
1 Tbsp minced fresh ginger
3 large cloves garlic, minced
2 boneless, skinless chicken breast halves (6 oz each), sliced crosswise
1 Tbsp reduced-sodium soy sauce
1 tsp toasted sesame oil
3 medium scallions, thinly sliced (about 1/2 c)
1/2 c reduced-sodium, fat-free chicken broth
1/2 c raw, unsalted cashews (3 oz), lightly toasted

Directions:
  1. Bring large pot of water to a boil. 
  2. Add broccoli, carrots, and noodles. 
  3. Cover and cook until vegetables are crisp-tender, 3 to 5 minutes. 
  4. Drain, transfer to medium bowl, and cover loosely with wax paper.
  5. Heat olive oil, ginger, and garlic in wok or large nonstick skillet over medium-high heat. Cook, stirring, until garlic starts to turn golden, 1 to 2 minutes. 
  6. Add chicken, soy sauce, and sesame oil. Stir-fry 4 to 5 minutes, or until cooked through. 
  7. Add scallions and stir-fry 1 minute.
  8. Stir in noodles, veggies, and broth and heat through. 
  9. Sprinkle each portion with 2 tablespoons of the cashews.

Nutritional info per serving: 398 cal, 30 g pro, 42 g carb, 5 g fiber, 14.5 g fat, 2.5 g sat fat, 47 mg cholesterol 

Happy Eating!
Creativity Bug ~ Sue

Wednesday, April 20, 2011

BESTeam Weekly Feature - Plum Beadacious

Come check out this week's BESTeam featured site Plum Beadacious

Plum Beadacious owner LeAllyson feels that creating beautiful handcrafted items is very important. She was introduced to making beaded jewelry by her daughter and “ was surprised to find out how much I enjoyed it!”. It has become a passion of hers for more than seven years and she began selling her creations to friends and jewelry fans five years ago.

LeAllyson’s desire is to create jewelry that delights the eye and is a joy to wear! She enjoys selecting beautiful beads made from a variety of materials. LeAllyson works with lampwork beads, crystals, Czech glass beads, freshwater pearls and semi-precious stone and strives to provide affordable jewelry to those who want to adorn themselves in something beautiful.

Strike Me Pink Beaded Silver Spiral Necklace


Shiny silver plated spiral links connect gleaming pink cats eye beads with a lustrous mother of pearl oval pendant in this fresh contemporary necklace.

Red Wine Lampwork Bead and Silver Earrings


The lampwork beads in these earrings display swirls of white and pink on a red wine background. They are capped at both ends with bright silver plated beadcaps. Small clear aurora borealis Swarovski crystals sparkle at the bottom of the earrings. The beads are handwrapped with sterling silver wire to sterling silver earwires. 

Rose Plum Crystals Sterling Silver Necklace


Delicate soft rose plum Czech glass crystals are handwired to this necklace. Tiny clear glass seedbeads strung on the light beading wire reflect back the color. The clasp is a sterling silver lobster clasp.

These are only a few of the wonderful pieces of jewelry available. Please check out the rest of this beautiful collection at Plum Beadacious and also take the time to view the Beadaciously Yours blog.

Happy Shopping!
Creativity Bug ~ Sue

Monday, April 18, 2011

Featured Freebies for the Week of April 18th

Hello and Happy Monday to everyone!

Here are this week's freebie images and digital stamps from blogs, websites, and our crafting friends:

Di's Dig Downloadsi  features Teddy's new home digital image

Art by Andy Bauer features a bunch of free digital images including a few dogs, cats, a bear, and a bunny

The Greeting Farm is offering a free digital stamp of Easter Ian and Easter Anya

Bugaboo Stamps is offering a free digital stamp every Friday

Netty's Cards shares various Anniversary Circle sentiments.

That's it for today! If you have any digital stamps or freebie images to share, please feel free to post a link in the comment section.

Have fun crafting!
Creativity Bug ~ Sue

Friday, April 15, 2011

Recipe Friday: Chicken Vegetable Barley Soup

The weather in Illinois is still cold and rainy one day while nice and spring like the next. This soup is a nice pick me up/warm me up kind of meal.

Chicken Vegetable Barley Soup


Ingredients:

2 lbs skinless boneless chicken breasts, cut into bite sized pieces
1 teaspoon poultry seasoning
2 tablespoons olive oil
1 ½ cup chopped fresh mushrooms
2 celery stalks, diced
1 cup chopped carrot
½ cup chopped onion
½ cup chopped pepper (red, green, yellow, or orange)
4 cloves garlic, minced
2 teaspoons dried basil, crushed
1 teaspoon dried parsley, crushed
¼ teaspoon ground black pepper
6 cups chicken broth
1 lbs potatoes, cut into 1-inch pieces (about 2 ¾ cups)
½ cup quick cooking barley

Directions:
  1. In a medium bowl, toss chicken breast pieces with poultry seasoning; set aside
  2. In a Dutch oven, heat 1 tablespoon olive oil over medium heat. Add mushrooms, celery, carrot, onion, pepper, garlic, basil, parsley, and black pepper. Cook for 10 minutes, stirring occasionally. Remove vegetables from Dutch oven; set aside.
  3. Add remaining 1 tablespoon olive oil to Dutch oven; heat over medium head. Add chicken pieces and cook for about 5 minutes or until browned; stir occasionally.
  4. Return vegetables to Dutch oven. Add broth and bring to boil.
  5. Add potatoes and barley to Dutch oven, return to boil, and reduce heat.
  6. Cover and simmer about 15 minutes or until potatoes are tender.
  7. Makes 8 (1 ½ cup) servings.
Happy Eating!
Creativity Bug ~ Sue

Thursday, April 14, 2011

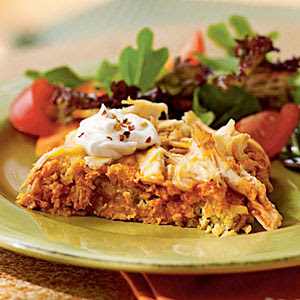
Recipe Friday: Chicken Tamale Casserole

The one thing I miss about living in Arizona is all the wonderful Mexican and Southwestern foods. Since moving back to Illinois, I haven’t been able to find anything like it. A friend of mine sent me a recipe and said it was “pretty close” to the real thing so I should try it.

Of course, I tweaked it a bit to have more fiber and some more spices. So here you have the updated, almost “Mexican” version of Chicken Tamale Casserole.

Chicken Tamale Casserole


Ingredients:
      1 1/2 cup pre-shredded 4-cheese Mexican blend cheese, divided
      1/3 cup fat-free milk
      1/4 cup egg substitute or one egg
      1 teaspoon ground cumin
      1/8 teaspoon ground red pepper
      1 (14 3/4-ounce) can cream-style corn
      1 (8.5-ounce) box corn muffin mix (such as Martha White)
      1 (4-ounce) can chopped green chilies, drained
      Cooking spray
      1 (10-ounce) can red or green enchilada sauce (such as Old El Paso)
      2 cups shredded cooked chicken breast (seasoned with your favorite spices)
      1 can black or kidney beans, drained
      1/2 cup fat-free sour cream
Preparation:
  1. Preheat oven to 400°.
  2. Combine 1/2 cup cheese and next 7 ingredients (through chilies) in a large bowl, stirring just until  moist. Pour mixture into a 13 x 9–inch baking dish coated with cooking spray.
  3. Bake at 400° for 15 minutes or until set.
  4. Pierce entire surface liberally with a fork; pour ½ can of enchilada  sauce over top. 
  5. Mix chicken, beans, and remaining ½ can of enchilada sauce together. Pour over top of corn bread mixture.
  6. Sprinkle with remaining 1 cup cheese. 
  7. Bake at 400° for 15 minutes or until cheese melts. 
  8. Remove from oven; let stand 5 minutes.
  9. Cut into 8 pieces; top each serving with 1 tablespoon sour cream 
Happy Eating!!
Creativity Bug ~ Sue

Wednesday, April 13, 2011

Remembering Grandma - Sharing the Love of Baking

I found out today that a friend of mine's grandma passed away. It got me starting to think about my grandma and the things I had in common with her. The one thing that always stood out was our mutual love of baking.

Grandma Lena (my dad's mom) made the best cookies and would share them on birthdays and special occasions. At Christmas time, she would fill large tins of cookies and present them to each of her children. My dad would tease us and say "since my name is on the tin, that must mean they are all for me". The greatest joy was my first Christmas away from home and receiving a package with cookies especially made just for me by my grandma.

I still remember the first time she let me watch her make a batch of her famous honey cookies. She would take out a TV tray, measure out all the ingredients using her hands as measuring utensils, and sit in her favorite chair while mixing the ingredients by hand. I was always amazed at how each cookie would come out the same size and perfectly baked.

As the years went by, I too learned how to make cookies, cakes, pies, and other desserts while experimenting in my mom's kitchen. To this day, I can't remember a time when I don't volunteer to make a friend a birthday cake or sign up at work to bring in the dessert goodies for a potluck.

In honor of my grandma, I wanted to share with you a simple cake that can be enjoyed on a relaxing Sunday while visiting with family or shared with special friends.


Double-Lemon Poppy Seed Cake


 Ingredients:

1 box (2-layer size) lemon cake mix
1 pkg.  (3 oz.) JELL-O Lemon Flavor Gelatin
1-1/4 cups water
1/2 cup  oil
4 eggs
1/4 cup  poppy seed
1/2 cup (1/2 of 8-oz. tub) PHILADELPHIA Cream Cheese Spread
2 Tbsp.  butter, softened
1 cup powdered sugar, sifted
2 Tbsp.  shredded peel and 1 Tbsp. juice from 1 lemon, divided

Directions:
  1. Heat oven to 350 degrees
  2. Beat first 5 ingredients in a large bowl with a mixer until well blended.
  3. Stir in poppy seed. Pour into well-greased and lightly floured 12-cup fluted tube pan or 10-inch tube pan.
  4. Bake 50 minutes to 1 hour or until toothpick inserted near center comes out clean.
  5. Cool in pan 30 minutes. Loosen cake from sides of pan with knife. Invert cake onto wire rack; gently remove pan. Cool cake completely.
  6. Beat cream cheese spread and butter with mixer on low speed until well blended. Gradually beat in powdered sugar and lemon juice. Spread over top of cake. Garnish with peel.
  7. Store cake in refrigerator until ready to serve.
Remember in the fast paced world we live in to stop and smell the roses, spend time with loved ones, and teach a young child your talents.

Creativity Bug ~ Sue