Ads 468x60px

Pages

Friday, September 30, 2011

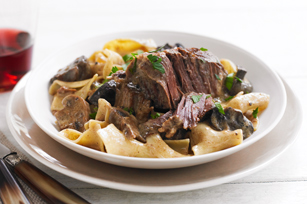
Recipe Friday: Slow Cooker Short Rib Stroganoff

Brrr! The weather is sure getting cold here in the midwest which means it is time to heat up the oven and take out the slow cooker.

This week’s recipe was created by the Kraft Foods test kitchen and has been rated with 5 stars. I haven’t tried the recipe yet myself, but plan on getting all the ingredients for Saturday’s supper.

Slow Cooker Short Rib Stroganoff


Ingredients:
5 Tbsp. flour, divided
2 tsp.  smoked paprika, divided
1-1/2 tsp. salt, divided
4 lb.  beef short ribs
2 Tbsp. oil
1 pkg.  (8 oz.) whole mushrooms, halved
1 onion, coarsely chopped
3 cloves  garlic, minced
1/2 tsp. ground black pepper
1 cup  beef broth
2 Tbsp. Worcestershire sauce
1 cup  BREAKSTONE'S or KNUDSEN Sour Cream
1 pkg. (16 oz.) egg noodles

Directions:

MIX 1/4 cup (4 Tbsp.) flour, 1 tsp. paprika and 1/2 tsp. salt. Add to ribs; toss to evenly coat. Heat oil in large skillet on medium heat. Add ribs; cook 5 min. or until evenly browned, turning occasionally.

PLACE ribs in slow cooker; top with remaining paprika, salt, vegetables, garlic, pepper, broth and Worcestershire sauce. Cover with lid. Cook on HIGH 6 hours (or on LOW 8 to 10 hours).

REMOVE ribs from slow cooker; skim surface of sauce. Discard rib bones. Return meat to slow cooker with sour cream and remaining flour; stir. Cook, covered, on LOW 10 to 15 min. or until slightly thickened. 
Meanwhile, cook noodles as directed on package.

DRAIN noodles; place in large serving bowl. Add meat mixture; stir.

Happy Eating!
Creativity Bug ~ Sue

Monday, September 26, 2011

Featured Freebies for the Week of September 26th

Hello and Happy Monday to Everyone!

Here are this week's free digital images or printables found on websites, blogs, or submitted to us from friends and followers:

GTC’s Crafty Corner is getting ready for Christmas with digital freebies including Christmas Holly, flying Rudolph, Gingerbread men, and Rudy.

GTC’s Crafty Corner  also shares a Halloween ghost digital image.

Lili Shrimp shares a magic mushroom house,  angel, and daisy girl digital images

Dustin Pike shares a frog, the headless horseman, and woodland deer digital images


That’s all for this week!  Happy Crafting!
Creativity Bug ~ Sue

Friday, September 23, 2011

Recipe Friday: Chef Boyardee

Yes, you read that right! My friend Heather is hosting a Chef Boyardee party to reintroduce the product to the older generation. Chef Boyardee’s goal is to show that with a few tweaks and a couple of added ingredients, the whole family will love Chef Boyardee ravioli and Beefaroni.

So without further ado, this week’s recipes include Taco-roni  and  Ravioli Lasagna.

Taco-roni
This taco-inspired dish combines Beefaroni®, tomatoes, black beans, and corn, and is topped with cheese and crunchy tortilla chips.
 Ingredients
·         2 can (15 oz each) Chef Boyardee® Beefaroni®
·         1 can (14.5 oz each) Hunt's® Diced Tomatoes, drained
·         1 can (15 oz each) Rosarita® Premium Whole Black Beans, drained, rinsed
·         1 cup frozen whole kernel corn
·         1 teaspoon ground cumin
·         1/4 cup shredded reduced fat Mexican cheese blend
·         1/2 cup broken yellow tortilla chips

Directions

1.       Place beefaroni, drained tomatoes, beans, corn and cumin in large saucepan; stir to combine.
2.       Bring to a boil over medium-high heat. Reduce heat, cover and simmer 15 minutes. Sprinkle with cheese and broken chips just before serving.


Ravioli Lasagna


Love the taste of lasagna, but don't have the time? Check out this new twist that's a timely take on a classic.

 Ingredients
·         PAM® Original No-Stick Cooking Spray
·         1 cup frozen loose cut leaf spinach
·         2 can (15 oz each) Chef Boyardee® Beef Ravioli
·         1 can (14.5 oz each) Hunt's® Diced Tomatoes, drained well
·         1-1/2 teaspoons dried Italian seasoning
·         1 cup 1% low-fat cottage cheese
·         1/2 teaspoon ground black pepper
·         1 cup shredded Italian blend cheese

Directions

1.       Preheat oven to 375°F. Spray 8x8-inch glass baking dish with cooking spray. Place spinach in microwave-safe bowl. Cover with plastic wrap and microwave on HIGH 2 minutes; squeeze spinach dry.
2.       Combine ravioli, drained tomatoes and Italian seasoning in medium microwave-safe bowl. Cover with plastic wrap and microwave on HIGH 3 to 4 minutes or until mixture is hot. Combine cottage cheese, spinach and black pepper in small bowl.
3.       Place half of ravioli mixture in bottom of baking dish. Top with half of cottage cheese mixture and 1/2 cup shredded cheese. Repeat layers. Bake 15 minutes or until cheese is hot and bubbly.

Happy Eating!
Creativity Bug ~ Sue

Wednesday, September 21, 2011

Wonderful Winter Paper Crafting Call

Scrapbook & Cards Today is pleased to announce its “Wonderful Winter” call. 

Scrapbook & Cards Today is a beautiful, seasonally inspired free papercrafting publication that can be found in both Canadian and US independent scrapbook stores. It can also be downloaded internationally, in its entirety and for free, by visiting www.scrapbookandcards.com.

Scrapbook & Cards Today would love to see your artwork—including layouts,cards, and altered projects with the following themes:
  • holiday celebrations
  • winter fun-both outdoors and in
  • the "perfect" winter day
  • Valentine's Day!
Scrapbook & Cards Today is also looking for:     
  • winter cards
  • gift tags
  • holiday gifts
  • well-balanced, double page layouts
  • multi-photo layouts      
Are you perfectly organized or have you found a way that helps curb your messy ways? Share your tips and tricks with Scrapbook & Cards Today so you can help others in the same situation. Photos as well as written submissions are welcome.
Be a part of the fastest growing scrapbook publication! Submissions can be made at www.scrapbookandcards.com/submission1.html or atideas@scrapbookandcards.com.

Compensation includes a fabulous goodie box from our sponsors plus two copies of Scrapbook & Cards Today! Please include your name, address, phone number, email address and supply list. Please ensure that all files sent are under 500KB. Summer CHA artwork and projects will be considered. This call ends October 3, 2011.

Good luck to everyone that submits to this call!
Creativity Bug ~ Sue

Burlap and Buttercups Design Team Call

Burlap & Buttercups is looking for a talented designer who can create a minimum of four scrapbook layouts each month using the Burlap & Buttercups kit supplies.  This position will begin with the November 2011 kit.

Applicants must meet the following criteria:
  • Have an active blog and be willing to post a link to the B&B site on your blog
  • Be willing to post one scheduled challenge per month on your personal blog as well as B&B's blog introducing the challenge, and be willing to share comments about participants' entries
  • "Like" the B&B Facebook page and follow our blog, serving as an active participant in the B&B "comments" area
  • Complete at least one post on your personal blog each month which showcases the designs you completed using B&B's kit supplies
  • Post B&B's kit reveals on your personal blog

Here's what Burlap & Buttercup offers to their new DT member:
  • Free main kit and add-on kit each month
  • At least two weeks to complete your projects
  • Afeatured spot on the B&B blog, where we'll highlight your sketches and layouts
  • Your bio and photo on our blog, along with a link to your own blog
  • A wonderful opportunity to work with a talented team of designers and get to know others who share a passion for scrapbooking!

All applicants must live within the United States. Send the following information to info@burlapandbuttercups.com and include "Design Team Application" in the subject line:
  • At least three samples of your original work
  • A brief bio
  • A list of any previous and current design teams
  • Your mailing address
  • Links to any websites or blogs where your work is featured, as well as the link to your personal blog

This call ends September 30, 2011, at 11:59 MST, and the DT member selection will be announced on October 3, 2011.

Good luck to everyone that tries out for the design team call!
Creativity Bug ~ Sue

Monday, September 19, 2011

Featured Freebies for the Week of September 19th

Hello and Happy Monday to Everyone!

Here are this week's free digital images or printables found on websites, blogs, or submitted to us from friends and followers:

RubberStamping About.com shares with us three cute spiders and a bubbling cauldron just right for Halloween

Digital Doodling shares Teenie all dressed up for Halloween digital image

Pixie Dust Studio shares Witch Hazel the adorable witch digital image

MyGraphico shares Yummy Candy, Happy Halloween, Halloween Odds and Ends, and Lovely Tickets printables

That's all for this week! Happy Crafting!
Creativity Bug ~ Sue

Friday, September 16, 2011

Recipe Friday: Baked Cheesy Chicken Penne

This week's recipe is for Baked Cheesy Chicken Penne, which is perfect on a cold autumn night. The recipe was developed by Our Best Bites that they adapted from Martha Stewart.

Baked Cheesy Chicken Penne


Ingredients:

6 tablespoons butter, plus more for baking dishes
kosher salt and black pepper
1 pound penne rigate
1 teaspoon olive oil
2 boneless, skinless chicken breast halves (about 8 ounces each), halved horizontally
1/2 cup plus 2 tablespoons flour
6 garlic cloves, finely minced
6 cups whole milk
10 ounces white or cremini mushrooms, trimmed and thinly sliced
1 cup sliced oil-packed sun-dried tomatoes, drained
1 1/2 cups shredded provolone (6 ounces)  (or Italian blend which contains provolone, mozzarella, and other white cheeses)
1 1/2 cup freshly grated Parmesan (about 6 ounces)

Directions:

  • Preheat oven to 400. Butter two shallow 2-quart baking dishes.
  • In a large pot of boiling salted water, cook pasta 3 minutes short of al dente; drain pasta and set aside.
  • While pasta is boiling, heat oil over medium-high heat in a large skillet.
  • Season chicken with salt and pepper; cook until opaque throughout, 3 to 5 minutes per side. Halve each piece lengthwise, then thinly slice crosswise. 
  • While chicken pan is still hot, toss the mushrooms in and saute until golden brown (3-4 minutes).  Use a little extra olive oil if needed.
  • In a 5-quart Dutch oven or heavy pot (I just use the pot I cooked my pasta in), melt butter over medium. Add flour and garlic; cook, whisking for 1 minute. While whisking constantly, gradually add milk; bring to a simmer.  Keep whisking frequently as sauce thickens, about 1 minute more. Add mushrooms and tomatoes; cook 1 minute. Take the pan off the heat and gradually stir in shredded cheese and 1/2 cup Parmesan.
  • Add chicken and pasta to pot; season with salt and pepper to taste.
  • Divide pasta mixture between baking dishes.  Sprinkle remaining Parmesan on top.
  • Bake, uncovered, until top is golden and bubbling, about 25 minutes. Let stand 5 minutes before serving.

Have a wonderful weekend!
Creativity Bug ~ Sue

Thursday, September 15, 2011

Halloween Dress Up Printable

I can't believe that Halloween is just around the corner! While the weather tells me the season is changing, it still feels like we just celebrated the 4th of July a few weeks ago.

Babalisme is getting into the Halloween spirit by offering an adorable Halloween Dress Up printable that I wanted to pass along to our faithful followers.


To download your free printable, just click here and then click on the Scribd button to choose between download and print.

While checking out Babalisme's blog, I also discovered the Halloweenies Minicard printable just ready for download.


All you need to do is go here to download.

Happy Crafting!
Creativity Bug ~ Sue

Monday, September 12, 2011

Featured Freebies for the Week of September 12th

Hello and Happy Monday to Everyone!

Here are this week’s fabulous digital stamp and image freebies found on website and blogs or sent to us from friends and followers:

Torico’s Digital Gallery is sharing with us a few monsters, donuts, buttons, puppies, and chubby chicks digital images.

Anne’s Cards 4 U shares an acorn array, floral spray, and teapot set digital images.


GTC’s Crafty Corner is getting ready for the Christmas holidays with a flying Rudolph digital image

Just Inklined Digital Stamps shares a gorgeous cat called the King of Siam

That’s all the freebies we have this week.

Happy Crafting!
Creativity Bug ~ Sue

Sunday, September 11, 2011

The Cross at Ground Zero

The following is an article reprinted from Guideposts that I thought was appropriate for today’s 10 year remembrance of the tragedy of 9/11.

Working among the rubble after 9/11, my faith was restored when I discovered this cross.
By Frank Silecchia, Little Ferry, New Jersey


I'm an excavation laborer and a member of union local 731. Pick-and-shovel work is my trade. I live in New Jersey, but I'm a New York City native, Brooklyn-born and -bred.

After the Towers collapsed, my city was hurting. When I heard they needed guys like me for search-and-rescue work at Ground Zero, I couldn't get there fast enough.

I'd seen the news coverage, but that didn't prepare me for the reality. Down there it was like hell on earth. Fires burned out of control. Destroyed vehicles littered the streets. Everything was blanketed with dust; the air was filled with a choking stench. I soaked a bandanna with water before wrapping it around my head to cover my nose and mouth. I went to work wondering if I'd be able to get through this.

Six firefighters and I entered World Trade Center building six, which had been flattened by Tower One. We took a smoke-filled stairway down into the garage levels, searching for survivors. There were no cries for help, no signs of life. We spray-painted orange Xs to indicate where we'd searched and to help us find our way back.

After 12 hours of searching, we'd recovered three bodies. By then I was exhausted, but I couldn't quit. "Think I'll take a look over there," I told the firemen, motioning toward the remains of the lobby atrium.
Picking my way through the massive piles of debris, I peered into what had become a sort of grotto. Illuminated by the pale light of dawn were shapes . . . crosses. What? How did these get here? The largest was about 20 feet high. It must have weighed a couple of tons.

In that little grotto I felt a strange sense of peace and stillness. I could almost hear God saying, The terrible thing done at this site was meant for evil. But I will turn it to good. Have faith. I am here. I fell to my knees in front of the largest cross. Tears came, and I couldn't stop them. I cried like a baby.

Finally I was able to pull myself together. I grabbed my gear and left the strange grotto to go back to search-and-rescue work. But first I spray-painted "God's House" on the atrium ruins.

Digging day after day at Ground Zero was the hardest work I'd ever done. Often I was so drained I felt I couldn't go on. That's when I'd go to God's House. Standing there in front of that 20-foot-high steel-beam cross, I always felt my strength and spirit renewed.

Word spread. The cross had the same healing effect on others too. Firemen, police, volunteers, grieving survivors, visiting dignitaries and clergy. They would walk into God's House, see the cross and fall to their knees crying, like I had. Some people sang, some prayed. Everyone left changed.

There are some who say that the cross I found is nothing more than steel. That it was just plain physics that broke the steel beam into the shape of a cross when it plunged through the roof of building six. But I believe differently.

So does my friend Father Brian Jordan. He was a chaplain at Ground Zero and is a priest at St. Francis of Assisi in Midtown. When the time came for what was left of building six to be removed, God's House faced demolition. Father Jordan talked to officials and persuaded them to save the cross. After it was removed from the site, ironworkers fixed the cross to a concrete base, then hoisted it up and mounted it atop a 40-foot foundation that had been a pedestrian walkway outside the World Trade Center. It stood high enough that the rescue workers who were down in the pit could see it whenever they lifted their heads.

Ground Zero was not obviously a place of hope. But it was there that I learned we can always have faith. In fact, we must have faith if we are to go on. New life will rise from the ashes. I know that because the cross was a sign, a promise from God that he is with us even in the face of terrible evil and untold suffering. Especially then.

In honor of all those lost on 9/11, all those that worked at Ground Zero, and all those men and women who fight for our country!

God Bless America!
Creativity Bug ~ Sue

Friday, September 9, 2011

Recipe Friday: Garlic Parmesan Pull-Apart Bread

I am a carbaholic/bread addict, so when I saw this recipe for Garlic Parmesan Pull-Apart Bread on The Pastry Affair blog I knew I found a recipe keeper.

My mouth virtually watered as I read the ingredients and discovered that this yummy bread was very easy to make and could be on my table in less than an hours time.

Serve it as an appetizer at a dinner party or alongside your favorite Italian entrée with a dinner salad.

Garlic Parmesan Pull-Apart Bread


Yields 1 loaf
Ingredients:
2 teaspoons active dry yeast 
1 1/3 cups barely warm water 
2 tablespoons extra-virgin olive oil 
2 teaspoons salt 
3 1/2 cups all purpose (or bread) flour 
1/4 cup butter, melted 
1 tablespoon dried parsley flakes 
2 cloves garlic, minced 
1/4 cup freshly grated Parmesan cheese
Directions:
In a large mixing bowl, stir together the yeast and water. Let sit 5 minutes until yeast is foamy.
Mix in the olive oil, salt, and flour. If you have a stand mixer, attach the dough hook and knead the dough for 5-6 minutes, or until elastic. If you are doing this by hand, knead the dough on a lightly floured surface until dough is elastic, 7-10 minutes.
Transfer dough to a lightly oiled bowl and cover with a clean kitchen towel. Allow to rise for 1 1/2 to 2 hours, or until dough is doubled in size.
In a small bowl, combine melted butter, parsley flakes, and minced garlic. Set aside.
Punch down the dough. Tear off small pieces of dough (roughly the size of the bowl of a medium spoon), coat in the butter mixture, and place in the bottom of a Bundt pan.
Repeat this process until you have one layer of dough balls.
Sprinkle on 1/3 of the Parmesan cheese.
Continue layering the dough balls and cheese until you have 3 layers.
Cover the pan with a clean towel and allow to sit until dough has doubled in size, 20-30 minutes.
Preheat oven to 350 degrees F (175 degrees C).
Bake for 25 to 30 minutes, or until bread is golden brown. Serve hot with a side of marinara or tomato sauce.
Pass the bread!
Creativity Bug ~ Sue

Thursday, September 8, 2011

Get Featured on Living Locurto

Are you creative? Want to be featured on Living Locurto?


Living Locurto is looking to meet creative people who can come up with new and original craft ideas. If Living Locurto features you, your idea will be seen by over 115,000 people or more in one month! Pretty cool, huh? You don’t have to blog to be considered. Just crafty!
What Living Locurto is looking for:
§  Super creative ideas that are simple to make. (see a list of ideas below)
§  Simple to understand instructions and a list of supplies used.
§  Quality photos. – Must not be blurry with good natural light (means using the light from a window or outside, no pop-up flash)
§  2-4 photos total. Must have several good images of the final product. Can also have photos of the craft in progress. Step-by-step photos are not required, but fine if you want to include them.
§  If you blog, I would ask that you wait at least a week after your feature to blog about your craft.
Sound like fun? Read the Submission Rules and send your craft idea and photos to this email address.
SUBMISSION RULES
1.       Craft must be something new, not something you have previously blogged about.
2.       Instructions and supply list must be included in an email. No word documents or PDF attachments.
3.       Photos must be no larger than 800 pixels wide. If you don’t know what that means, just send me what you have.
4.       By sending photos, you agree that you own the rights to the photo. If someone else took the photos, please get permission for me to use them and provide credit info.
5.       If you blog, you agree to wait one week after your feature on LivingLocurto.com to blog about your project.
6.       You must provide your name and blog URL to receive credit. Don’t forget to send that information with your craft.
7.       Send Instructions and 3-6 good quality photos to this email: LivingLocurto.Crafts(at)gmail.com
Ideas:
§  Simple Sewing and No-Sew Ideas
§  All Kinds of Crafts
§  DIY Home Decor (Trash to Treasure)
§  DIY jewelry
§  Ideas for kids
§  Holiday – Wreaths, home decor, centerpieces, gifts
§  Party Decor – Baby; Wedding Showers, Birthdays for kids or adults, casual gatherings, centerpieces.
§  Food Crafts – Recipes in a Jar, edible crafts, party arrangements 
Good luck to all those who enter! If chosen, post a comment here so that we can make sure to link to your feature.
Happy Crafting!
Creativity Bug ~ Sue